
How To Track Purchase Event On An E-Commerce Website Using GA4 And GTM
Table of Contents
If you run an e-commerce website, you probably want to track how many sales you make and how much revenue you generate. One way to do this is to use Google Analytics 4 (GA4) and Google Tag Manager (GTM) to measure the purchase event on your e-commerce website. In this blog post, I will show you how to track purchase event on an e-commerce website using GA4 and GTM, including how to set it up and verify that it works correctly.
What is the Purchase Event?
The purchase event is one of the predefined events in GA4 that represents a completed transaction on your e-commerce website. It has several parameters that provide information about the transaction, such as:
- transaction_id: a unique identifier for the transaction
- value: the total value of the transaction
- currency: the currency of the transaction
- items: an array of objects that describe the products purchased, each with its own parameters such as item_id, item_name, item_category, quantity, price, etc.
By tracking the purchase event, you can see how many transactions occurred on your e-commerce website, what products were purchased, and how much revenue was generated. You can also use this data to calculate metrics such as conversion rate, average order value, and revenue per user.
How to Set Up the Purchase Event Tracking Using GA4 and GTM?
To track the purchase event using GA4 and GTM, you need to do the following steps:
- Create a GA4 property and link it to your e-commerce website.
- Create a GTM account and container and add the GTM code to your e-commerce website.
- Create a GA4 configuration tag in GTM and enable enhanced measurement.
- Create a custom HTML tag in GTM that pushes the purchase data to the data layer.
- Create a GA4 event tag in GTM that triggers on the purchase data layer event and sends the purchase event to GA4.
- Test and debug your setup using preview mode and real-time reports.
Let’s go through each if these steps in detail.
Step 1: Create a GA4 Property and Link it to Your E-commerce Website
To create a GA4 property, go to your Google Analytics account and click on Admin. Then, under Property, click on Create Property. Choose Web as your platform and enter your website name and URL. Click Next and follow the instructions to create your GA4 property.
To link your GA4 property to your website, go to your website’s source code and find the global site tag (gtag.js) that you added when you created your GA4 property. It should look something like this:
Copy the GA4 measurement ID (G-XXXXXXXXXX) from the code and paste it somewhere for later use. You can also find it in your GA4 property settings under Data Streams.
Step 2: Create a GTM Account and Container and Add the GTM Code to Your E-commerce Website
To create a GTM account and container, go to https://tagmanager.google.com/ and sign in with your Google account. Click on Create Account and enter your account name and country. Then, click on Continue and enter your container name and choose Web as your target platform. Click on Create and accept the terms of service.
To add the GTM code to your website, go to your GTM container and click on Tag Manager Setup Assistant. Copy the code snippets that appear on the screen and paste them into your website’s source code as instructed. The first snippet should go as high as possible in the section of every page, while the second snippet should go immediately after the opening tag of every page.
Step 3: Create a GA4 Configuration Tag in GTM and Enable Enhanced Measurement
To create a GA4 configuration tag in GTM, go to your GTM container and click on Tags. Then, click on New and choose Google Analytics: GA4 Configuration as the tag type. Enter your GA4 measurement ID (G-XXXXXXXXXX) that you copied earlier in the Measurement ID field. Under Tag Configuration, check the box that says Enable Enhanced Measurement. This will allow GA4 to automatically track some basic events on your website, such as page views, scrolls, clicks, etc. You can also customize which events you want to enable or disable under Enhanced Measurement Settings.
Under Triggering, choose All Pages as the trigger for your tag. This will make sure that your tag fires on every page of your website. Click on Save and name your tag something like GA4 Configuration.
Step 4: Create a Custom HTML Tag in GTM that Pushes the Purchase Data to the GTM Data Layer
To create a custom HTML tag in GTM that pushes the purchase data to the data layer, go to your GTM container and click on Tags. Then, click on New and choose Custom HTML as the tag type. In the HTML field, enter the following code:
<script>

  // Get the purchase data
  // This is an only an example how might the purchase data look like
  // You will need to adjust it based on your site's structure and format

  var purchaseData = {
    transaction_id: "T123456",
    value: 100,
    currency: "USD",
    items: [
      {
        item_id: "P123",
        item_name: "Product 1",
        item_category: "Category 1",
        quantity: 1,
        price: 50
      },
      {
        item_id: "P456",
        item_name: "Product 2",
        item_category: "Category 2",
        quantity: 2,
        price: 25
      }
    ]
  };

  // Push the purchase data to the GTM data layer

  window.dataLayer = window.dataLayer || [];
  window.dataLayer.push({
    event: "purchase",
    ecommerce: {
      purchase: purchaseData
    }
  });

</script>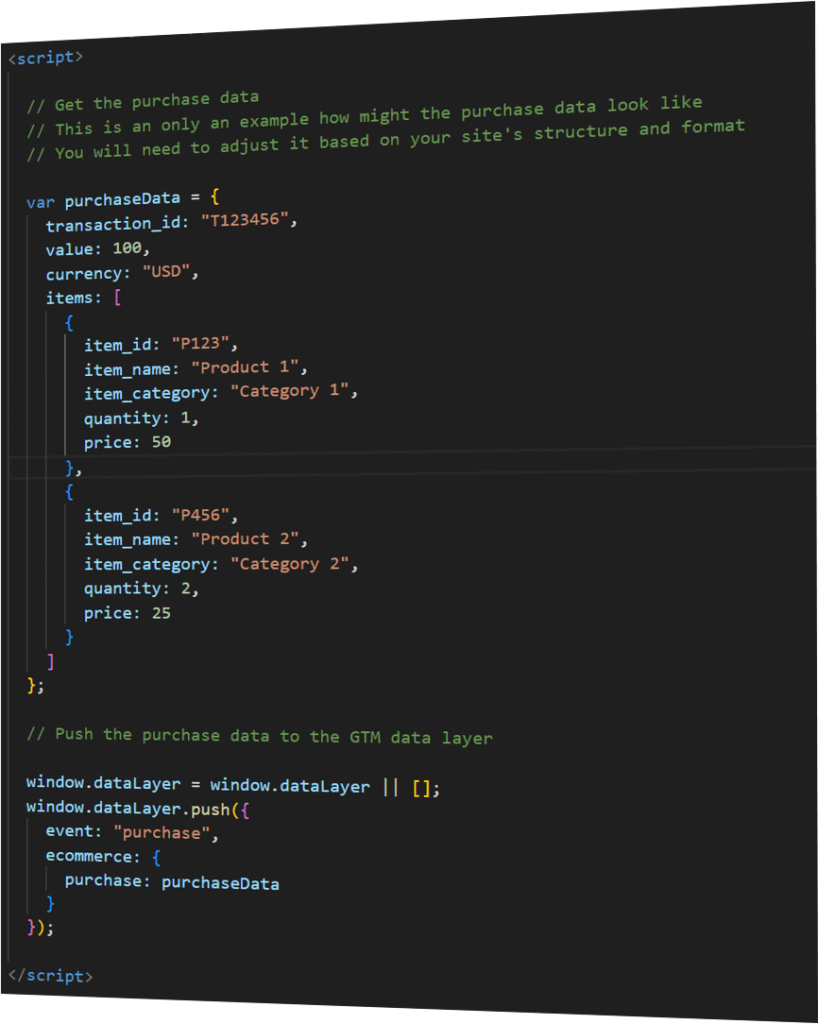
This code will get the purchase data from your website’s backend or frontend and push it to the GTM data layer with the event name “purchase”. The purchase data should include the transaction_id, value, currency, and items parameters as described earlier. You will need to adjust the code according to your website’s structure and format.
Under Triggering, choose a trigger that corresponds to when the purchase is completed on your website. For example, you can use a Page View trigger with a Page URL condition that matches thank you or confirmation page. Alternatively, you can use a Custom Event trigger with an Event Name condition that matches a custom event that you fire on your website when the purchase is completed. Click on Save and name your tag something like Purchase Data Layer.
Step 5: Create a GA4 Event Tag in GTM that Triggers on the Purchase Data Layer Event and Sends the Purchase Event to GA4
To create a GA4 event tag in GTM that triggers on the purchase data layer event and sends the purchase event to GA4, go to your GTM container and click on Tags. Then, click on New and choose Google Analytics: GA4 Event as the tag type. Under Tag Configuration, enter your GA4 measurement ID (G-XXXXXXXXXX) in the Measurement ID field. In the Event Name field, enter “purchase”. This will match the event name that you pushed to the data layer in the previous step.
Under Event Parameters, click on Add Parameter and choose ecommerce.purchase from the drop-down menu. This will automatically populate the parameter name and value fields with ecommerce.purchase and {{ecommerce.purchase}} respectively. This will tell GTM to use the purchase data that you pushed to the data layer as the value for the ecommerce.purchase parameter.
Under Triggering, choose a Custom Event trigger with an Event Name condition that matches “purchase”. This will make sure that your tag fires only when the purchase data layer event occurs. Click on Save and name your tag something like GA4 Purchase Event.
Step 6: Test and Debug Your Setup Using Preview Mode and Real-time Reports
To test and debug your setup using preview mode and real-time reports, go to your GTM container and click on Preview. This will open a new tab with a debug console at the bottom of the screen. Then, go to your website and complete a test purchase. You should see your tags firing in the debug console as expected. You can also check the details of each tag and its parameters by clicking on it.
To verify that your purchase event is sent to GA4 correctly, go to your GA4 property and click on Real-time. You should see your purchase event appearing in the Events report with its parameters. You can also check the Conversions report to see how many transactions occurred on your website and how much revenue was generated.
Congratulations! You have successfully learned how to track purchase event on an e-commerce website using GA4 and GTM, including how to set it up and verify that it works correctly.
Read this post on Medium.